Thursday, November 29, 2012

Frosted Pink Roses

Before we jump into red & green, can we have a shot of pink, please?
I really wanted to call these Winter Roses, but I guess since it's still fall, I'll have to go with "frosted."  I love an open rose shape, but couldn't find a cutter to match, so years ago, I made a template.  Once you realize that making your own templates enables you to make ANY shape you'd like, the world is your oyster...cookie...whatever.

If you've ever made a cookie with dots, or marbling, these are made using the same method...the swirl is adding on top of the wet flood icing.  But, if you'd prefer a raised outline instead for these flowers, here's an example.
You might know that I'm usually torn as to whether to add sanding sugar or not....remember the "trees of indecision?"  These were no exception.

In the end, I made some fully sanded, sanding on the swirl only, and not sanded at all.  And now you know why it takes me an hour and a half to pick out a lipstick...indecision.  I must work on this.


OK...let's make Frosted Rose Cookies. You'll need:

  • sugar cookies made from a template
  • royal icing, divided and tinted with AmeriColor Deep Pink, Soft Pink, Leaf Green & Electric Green
  • disposable icing bags
  • couplers and tips: #2
  • squeeze bottles
  • small ramekin
  • small (clean) paintbrush
  • sanding sugar
  • meringue powder
Use a #2 tip to outline the cookie shape in pink icing.

Use another #2 tip to outline the leaf in leaf green.

Thin the pink icings with water, a bit at a time, stirring with a silicone spatula, until it is the consistency of a thick syrup.  You'll want to drop a "ribbon" of icing back into the bowl and have it disappear in a count of "one thousand one, one thousand two." Four is too thick, one is too thin.  Count of 2-3 is good.  Cover with a damp dishcloth and let sit for several minutes.

Stir gently with a silicone spatula to pop and large air bubbles that have formed.  Pour into squeeze bottles.    

Working 6-8 cookies at a time, fill in the outline with the thinned flood icing, using a toothpick to guide to the edges and to pop large air bubbles.

Starting with the first cookie flooded, add the swirl in the contrasting color.

Thin the green icings as described above.  Flood the leaf in the darker green, and add a lighter green stripe right down the center, just as adding the swirl.

Let the cookies dry, uncovered, 6-8 hours, or overnight.

The next day, apply the sanding sugar.  Mix 1/4 teaspoon meringue powder with 1/4 teaspoon water.  Brush onto the cookies wherever you'd like the sanding sugar to stick.  Over a basket-style coffee filter, shake the sanding sugar onto the cookie, and shake off the excess. (Use the filter like a funnel to pour back into the container.)

Let dry 30 minutes before packaging.
Alright...bring on the red & green. 

Labels: ,

Sunday, November 25, 2012

Picky Palate's Chocolate-Peanut Butter-Butterscotch Bars

 
{Now that I have your attention...}

Picky Palate...I'm not even sure how long I've been reading Jenny's blog, but it's been one of my favorites ever since discovering it.  Mom to 3 adorable boys, Jenny shares her family's favorite meals on Picky Palate.

Need a dinner idea?  Jenny's got you covered.  Need a cookie recipe?  Jenny has that, too.
Not only is Picky Palate a fabulous blog...it's now a fabulous BOOK!  The official title is The Picky Palate Cookbook: 133 Recipes for Even Your Pickiest Eaters. Hardcover, spiral-bound, bright & cheerful, Jenny brings her approachable & delicious recipes right to your home.

From breakfast, to salad, to dessert...it's all in here, blog favorites and new recipes, too.

(Those are Jenny's world-famous Oreo-stuffed chocolate chip cookies.)

Jenny was kind enough to let me share a recipe from the book, and well, I went straight for the cookies.
{Are you surprised?}

No-Bake Chocolate Peanut Butter-Butterscotch Bars caught my eye because they have it ALL!  Chocolate, peanut butter AND butterscotch.  Hello, delicious!

You're going to want to make these.  These bars are rich, fudgy, and so worth every millimeter they'll add to your hips.


No-Bake Chocolate-Peanut Butter-Butterscotch Bars
{with permission from The Picky Palate Cookbook}

2 cups butterscotch chips (11 oz. bag is ok)
4 TBSP butter, softened and divided (I used salted)
2 cups creamy peanut butter
1 cup powdered sugar
1 (12 oz) bag semi-sweet chocolate chips
1/4 cup heavy cream

Line an 8x8" pan with foil (with some overhang for lifting) and spray with nonstick cooking spray.

Combine the butterscotch chips and 2 tablespoons of butter in a bowl on top of a saucepan of simmering water.  Stir until melted; the mixture will be the consistency of peanut butter.  Remove from heat.
Stir in the peanut butter.  Add the powdered sugar and stir until combined.

Transfer the peanut butter mixture to the prepared pan, spreading evenly.

Melt the chocolate chips and remaining 2 tablespoons butter in a bowl over a pan of simmering water.  Stir until melted, then add the cream, stirring until smooth.  Pour over the peanut butter layer, spreading evenly.

Refrigerate for 1 hour, or until firm.  Lift the foil edges to remove from the pan and cut into squares (a bench scraper is perfect for this.) Serve chilled or at room temperature.

Now that you've seen those bars, you'd like a copy of the book, wouldn't you?
Nod your head.  You do.

The Picky Palate Cookbook: 133 Recipes for Even Your Pickiest Eaters, by Jenny Flake

Enter to win by leaving a comment below telling who is the pickiest eater in your family.
(Comments will sometimes take a while to show, especially on a giveaway.)

Comments for the giveaway accepted through November 28th, 11:59pm CST.  Good luck!


Congrats to Leslie, who said, 
"I am, by far, the pickiest eater in my family. That is the main reason that I cook. I can control the process and ingredients."
Go on, take a bite! 


Labels: ,

Friday, November 23, 2012

And Ice Cream Saves the Day...

I have this problem.  I have perfectly wonderful recipes...recipes that I love...that my family loves...but, I still feel the need to try something new, new, NEW!!!

So, for Thanksgiving, I tried a new tart recipe.  It was different than any recipe I'd ever tried before.  I was sure the heavens would open and angels would sing as we sliced into it.
Reality?  It was horrid.
Thankfully, I also made ice cream.  Yes, pie ice cream to be exact.  Ice cream that sent Mr. E and my dad back for seconds.  Ice cream that made me forget that failure of a tart (almost).

The lesson, my friends?  Always.Make.Ice.Cream.


Coconut Cream Pie Ice Cream (that saved the day)

{hint: make sure all of your ingredients, other than sugar, are well-chilled}
2 eggs (pasteurized, if you'd like)
3/4 cup sugar
2 cups heavy cream
1 cup milk (2% or whole)
1 (15 oz.) can cream of coconut (such as this, not coconut milk)
1/2 cup shredded sweetened coconut
3 full graham cracker sheets (some crushed fine, some in chunks)

In a large bowl, whisk the eggs 1-2 minutes.  Slowly whisk in the sugar.  Once all of the sugar has been added, whisk for 1 minute more.

Whisk in the cream, milk and cream of coconut.  Pour into an ice cream maker and process as directed.

With 2 minutes until the freezing cycle is over, add the coconut and graham crackers.

When the ice cream is finished, transfer to a freezer-safe container and press plastic wrap directly onto the ice cream.  Freeze several hours, or until hardened.  Before serving, remove from freezer and let sit on the counter for 4-5 minutes.


Coconut Cream Pie Ice cream...it'll save your day, too. 

Labels:

Tuesday, November 20, 2012

Brown Sugar and Spice (and everything nice) Cut-out Cookies

It's seems only fitting that the day I was making sugar & spice (and everything nice) cookies, my sister would call to tell me that she's expecting a GIRL!!!
I have one boy; she has three, so look out, little niece....I see lots of tutus, polka dots, and hair bows in your future.  FINALLY, we can shop in the girls' section at Target!!!

{Please don't misunderstand...I. LOVE. MY. BOY.  I am so thankful that God graced me with a boy. I GIVE THANKS that he is a sweet 13-year-old, not an eye-rolling, surly 13-year-old like his mother was. *ahem*  But the shopping!  I've missed coordinating outfits.  It seems that all clothing manufacturers have decided that once a boy wears a size 7, he becomes a skater, or obsessed with skulls.  Aaaaand, boys clothes don't typically have dots and matching tights.}

Shall we talk about cookies?  I love, love, love these cookies.  They're a little softer than a typical sugar cookie because of the brown sugar...and the spice just makes them perfect for fall.  If you find gingerbread overpowering, try these.


Brown Sugar and Spice Cookies

3 cups unbleached, all-purpose flour
2 tsp baking powder
1/2 tsp cinnamon
1/4 tsp ginger
1/8 tsp freshly grated nutmeg
1/8 tsp allspice
1/2 cup granulated sugar (I use sugar that I've stored vanilla beans in)
1/2 cup light brown sugar (packed)
2 sticks salted butter, cut into chunks
1 egg
1 tsp pure vanilla extract


Preheat oven to 350.

Whisk the flour, baking powder and spices, set aside.

Cream the sugars and butter. Add the egg and extracts and mix until well-blended.

Gradually add the flour mixture and beat just until combined, scraping down the bowl, especially the bottom. (The dough will be quite thick...you may need to knead in stray bits of flour from the bottom of the bowl by hand.)
Roll on a floured surface to about 1/4" and cut into shapes. Place on parchment lined baking sheets and bake for 9-12 minutes, depending on the size of your cutter. Let sit a few minutes on the sheet, then transfer to a cooling rack.

Decorate as desired.

These cookies were decorated using images printed on frosting sheets.  The "give thanks" came from a sheet of stickers, so I scanned the entire sheet and printed them with my icing printer.

Here's everything I used:

Sugar & spice and everything nice...
that's what little (and big) girls are made of!

Labels: ,

Sunday, November 18, 2012

I Just Blogged to Say I Love You (Vol. 4: Thanksgiving Edition)

It occurs to me as I make this list that Thanksgiving to me is really about 3 things: turkey, dressing, and dessert.  Well, and being thankful and all that.

So, this is not exactly a well-rounded list of Thanksgiving ideas, but I hope you like it.
1. These little pilgrims were the very first post on Bake at 350...FIVE years ago!

2. If you're family is into math, or corny puns, how about making them some pumpkin PI (cookies)?

3. These little turkeys are made from a flower cookie cutter, and they just make me happy. They would be really fun to make with the kiddos while they're home this week.

4. Let's talk turkey (literally): our family always has a smoked turkey, but these two...one mayonnaise roasted, one beer can with bacon...have me wanting to make a second one.  Mayonnaise?  Bacon?  *sigh* I love food.

5. OK, so now that we've discussed the main dish, let's get back to dessert, shall we?  How about Pumpkin Cheesecake CAKE?!?

6. Or maybe...Caramel Pie?  Not Caramel Apple Pie, just caramel pie.  Have I mentioned Robyn is a genius?

7. It's me...being bossy again.  But, you guys...this *really* should be on your dessert table.

8. Sweet Potato Pie: think you like pumpkin pie?  You haven't tried sweet potato.  It's time.

9. Need a crust for those pies?  This is my go-to.

10. This little pie cookie is in my book. I love it...a pie COOKIE.  Anyway, Kami made these aDORable free printable little cards to go with them.  They'd be so cute as placecards!

11. Last but not least, turkey cake pops.  Thanksgiving really doesn't get any cuter than this.

As we head into Thanksgiving week,  I wish you all short check-out lines at the grocery store, a parking space by the cart return, and venti Starbucks to get you through the planning/shopping/prepping/cooking.


Labels: ,

Friday, November 16, 2012

An Icing Printer...for YOU!!! Seriously!

I am so, so excited to bring you guys this giveaway today!
I've talked about images printed on frosting sheets before...and there are a couple of frosting sheets projects in the book.  They are such a fun and easy way to decorate your cookies.

Yes, you can get image sheets printed at most local bakery supplies.  Yes, some grocery stores will print them for you, but there's something to be said for having one in your own house.  Listen...I like to stay in my pj's as looooong as possible.

Don't think these are just for cookies!  They're for cupcakes and cakes as well! 
I found Icing Images when I was looking for a new icing printer.  From doing a bit of searching online, I found that they had a great reputation for customer service.  I bought a compatible printer and Icing Images ink and I really couldn't be happier with them.  They're responsive, helpful, and fast!

I'm so HAPPY to say that Icing Images is going to give an entire imaging SYSTEM away to one Bake at 350 reader!!!  (I mean, that's better than any Black Friday deal.)  Here's what you'll get:
It retails for, oh, $499!!!  Whoa!

Enter through November 23rd, 11:59pmCST.  US residents only....thank you!

To enter:

  • leave a comment with the very first thing you would make using your edible imaging system

Congrats to Carmen who said,
"We have a 2-year birthday coming up and I want to make it a Veggie Tales themed day. I have a couple of ideas already but this would offer so many other opportunities." 


*I was not paid or given a free system/ink in exchange for this post.  I was just impressed with this company and wanted to share them with you. Edible Image system provided by IcingImages.com.*

For tips and info on using an icing printer, click here


Labels: , ,

Sunday, November 11, 2012

Pumpkin Cheesecake Brownies

I know I've been bossy lately..."you must make this," "you have to make that."
(My sister tells me I'm really good at bossy.)

OK, but y'all...YOU.MUST.MAKE.THESE.  Like this instant.  Throw a trench over your pj's, pull your hair back into a ponytail, swipe on some lipstick and mascara, and RUN to the grocery store for these ingredients.
{That running will make you feel less guilty when you eat 3 of these in one sitting.}

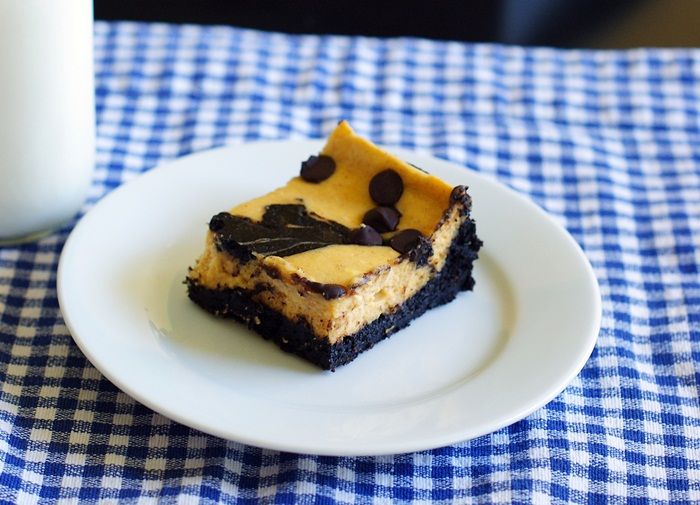
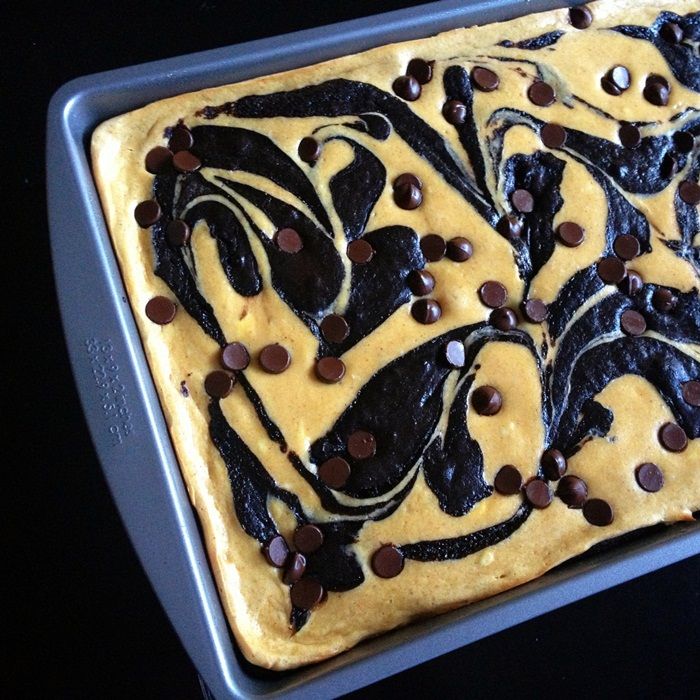
I apologize for the lack of pictures.  You know how I love 27 pictures of every recipe.  I made these while it was still dark outside so Mr. E could take them to work.  I intended to send the entire tray, but Mr. E in all of his wisdom said, "let me take half, so we'll have some to eat at home."  I love that guy.

{I managed to snap this with my phone before cutting and sending them on their way.}

The brownies are rich.  They are luscious.  They are decadent.  I'd be willing to bet that people who say they don't like pumpkin would love these...they're more cheesecake than pumpkin.
Let's get to it...

Pumpkin Cheesecake Brownies

for the cheesecake layer:
2 (8 oz.) packages (full-fat, people) cream cheese, at room temp.
1/2 cup pumpkin puree
3/4 cup sugar
2 teaspoons vanilla
1 teaspoon cinnamon
1/2 teaspoon ginger
1/4 teaspoon freshly grated nutmeg
1/4 teaspoon allspice
1/4 cup (regular, not light) sour cream
2 eggs, lightly beaten with a fork

for the brownies:
3/4 cup (1 1/2 sticks) unsalted butter
2 cups sugar
1 cup Dutch-process cocoa (such as Hershey's Special Dark)
1 teaspoon kosher salt
1/2 teaspoon baking powder
1 TBSP vanilla
3 eggs
1 cup unbleached, all-purpose flour
1/4 cup dark chocolate chips (such as Hershey's Special Dark)

Preheat oven to 325.  Lightly grease a 9x13" pan.  Set aside.

make the cheesecake mixture:
With the paddle attachment of an electric mixer, beat the cream cheese until no lumps remain.  Add in the pumpkin, sugar, vanilla and spices, beat until smooth.

On low speed, add in the sour cream and eggs until well combined.  Set aside.

make the brownies:
In a medium saucepan, melt the butter over low heat.  Add the sugar and stir over low heat until combined and hot, not bubbly.  You'll only need to heat it for a couple of minutes, until the mixture looks shiny.

Remove the pan from the heat, and stir in the cocoa powder, salt, baking powder and vanilla.  Whisk in the eggs until smooth.  Stir in the flour.

Pour about 3/4 of the brownie mixture into the prepared pan.  Spread with an offset spatula.  Pour the cheesecake batter over the brownie layer and spread evenly with an offset spatula. Drop the remaining brownie batter on top of the cheesecake layer.  Use the offset spatula to swirl the brownie dollops into the cheesecake making a pretty, abstract pattern.

Sprinkle with the chocolate chips.

Bake for 35 minutes or so, until the cheesecake layer is set.  Let cool completely on a wire rack, then chill and store in the refrigerator.  A bench scraper makes a great tool for cutting them.

{Brownie layer adapted from King Arthur Cookie Companion}

Here's a comment from one of the guys Mr. E works with:
"If my girlfriend made these, I might have to buy an engagement ring."  
Single ladies...let me know if it works.

Also, if you love the idea pumpkin and brownies, please check out these recipes from Picky Palate & Cookies and Cups!
♥Pumpkin + Brownies forever!!!♥

Labels: ,

Wednesday, November 7, 2012

Chocolate Peanut Butter Cut-out Cookies...and a very special birthday!

I've talked before about how my very favorite part of blogging is something that I never, ever expected.  I always thought the sugar would be the highlight of blogging, but no...it's the people I've had the pleasure to meet.

That leads me to Jessica from the blog, How Sweet It Is
Jessica is having a milestone birthday today...
THIRTY!!!

{Ahhh, I remember 30.  Kinda.}

Now, Jessica has been one of my favorite bloggers for a long time.  I love this girl.  I admire Jessica for her amazingly creative and delicious recipes...her stunning photography...her hilarious sense of humor and writing...her impeccable style...her blogging and social media smarts...and her beautiful, fun spirit.

{Jessica...this hot pink was as close as I could get to neon. ;)}

In August, I met Jessica and I can tell you, she's even more lovely in person.  (I won't hold it against her that she was BORN just about the same time I was going to see Grease 2 (2!) with my fellow 13-year-old girlfriends.)  I wanted to make a little something to celebrate her big day.

I just had this inkling that Jessica likes peanut butter and chocolate.  Maybe it was Jessica's Peanut Butter Stuffed Hot Fudge Cupcakes, or Chocolate Chip Cookie Dough Peanut Butter Cups, or Peanut Butter Fudge Brownie Trifle, or maybe Peanut Butter S'mores Squares...I sensed a trend.

So, I made cookies.  I made Chocolate Peanut Butter Cut-out Cookies.  And, y'all...you need to make them, too.

Chocolate Peanut Butter Cut-out Cookies for Jessica
{makes 12-18, depending on size}

2 & 1/2 cups unbleached, all-purpose flour
1/2 cup dutch-processed cocoa (such as Hershey's Special Dark)
2 teaspoons baking powder
1/8 teaspoon kosher salt
2 sticks (1 cup) salted butter, cut into chunks
1 cup sugar
1/2 cup smooth peanut butter (not all-natural)
1 egg
1 teaspoon vanilla

Preheat oven to 350.  Line cookie sheets with parchment paper.

In a medium bowl, whisk together the flour, cocoa, baking powder, and salt.  Set aside.

In a large bowl, use a paddle attachment to beat the butter and sugar together until light and fluffy.  Beat in the peanut butter until smooth.  Beat in the egg and vanilla.

In three additions, add in the flour mixture beating on low until just combined.  Scrape the bowl to incorporate any dry bits on the bottom of the bowl.

Divide the dough in half, form into two discs, and wrap in plastic wrap.  Refrigerate at least 30 minutes.

Mix flour and cocoa powder together to coat the rolling pin and rolling surface.  Roll the dough to about 1/4"-3/8" thickness.  Freeze the cut-outs on the cookie sheet for 10 minutes before baking.

Bake for 9-12 minutes.  Cool on the cookie sheet for 1 minute, then remove to wire rack to cool completely.

Decorate as desired with royal icing.

OH!  And, Jessica?  I ate them for you, too. ;)
HAPPY BIRTHDAY, sweet girl!!!

Labels: , ,