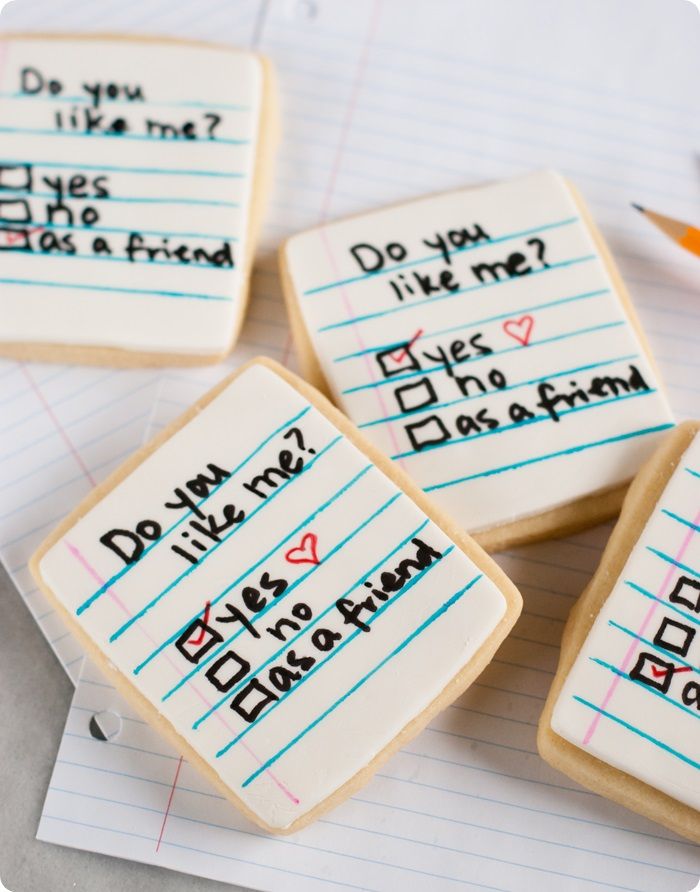
Friday, February 14, 2014

Wanna Neck?

Happy Valentine's Day!!!
"wanna neck" giraffe valentine cookies ♥
Have you ever looked at vintage valentines?  Oh my gosh...they are THE best!  Of course, the illustrations are darling, but they have the best puns!

"wanna neck" giraffe valentine cookies ♥
So, this is my version of a punny valentine: Wanna Neck?

giraffe valentine neck photo giraffevalentine11of14.jpg
My child assures me that "no one" knows what "necking" means.  Which just confirms my suspicion that kids these days don't watch nearly enough Happy Days reruns.

When Mr. E, king of the puns, came home from work, I had finished the giraffes, but the hearts didn't have wording on them, yet.  I was SURE he would be able to guess the pun.

Guess, I told him...guess the valentine pun!  Want to know what he said?

"Giraffe-ter my heart?"
Giraffe-ter my heart. Really.

We could not stop laughing.

Our family is weird.  But, you knew that from these cookies already.

To make these giraffe valentine cookies, you'll need:


giraffe valentine outline photo giraffevalentine1of14.jpg
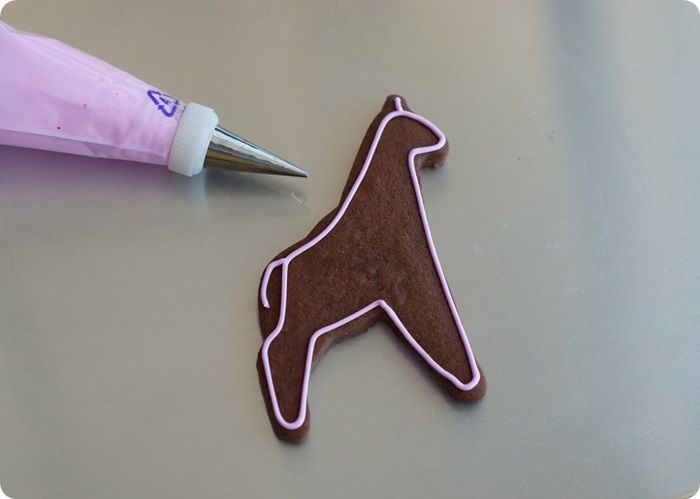
Use a #2 tip to outline the giraffe with pink icing.  Add a tail and horn.

Before thinning, reserve some piping consistency red icing for later.  Thin the pink and red icings with water, a bit at a time, stirring with a silicone spatula, until it is the consistency of a thick syrup.  (Reserve some of the white icing for piping details later.) You'll want to drop a "ribbon" of icing back into the bowl and have it disappear in a count of "one thousand one, one thousand two." Four is too thick, one is too thin.  Count of 2-3 is good.  Cover with a damp dishcloth and let sit for several minutes.

Stir gently with a silicone spatula to pop and large air bubbles that have formed.  Pour into squeeze bottles.

giraffe valentine flood photo giraffevalentine2of14.jpg
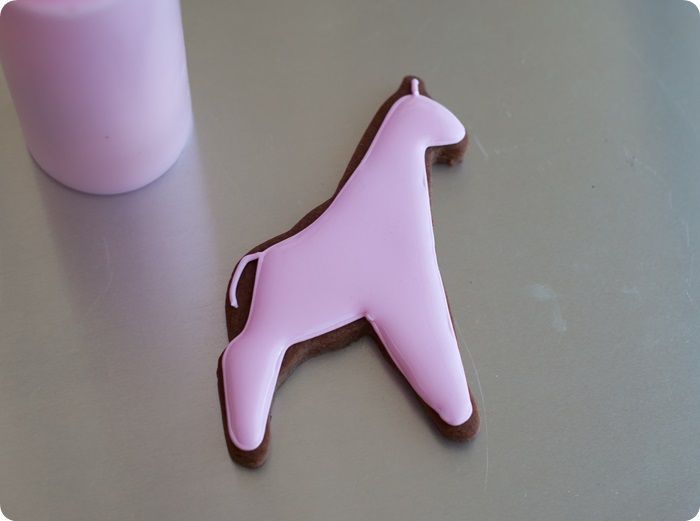
Working 6-8 cookies at a time, flood the outlines with the thinned pink icing, using a toothpick to guide to the edges and pop large air bubbles. 

making hearts from dots of icing...
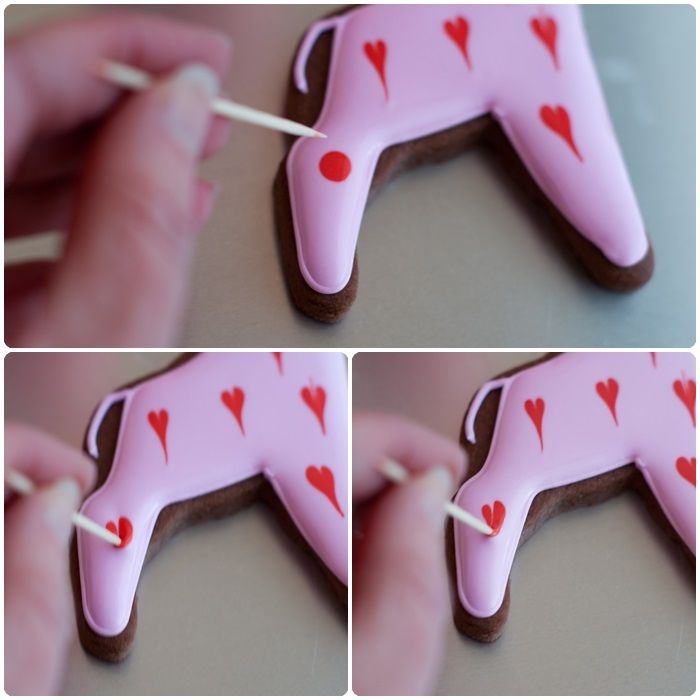
Starting with the first cookie filled, drop dots of thinned red icing onto the pink.  Drag a toothpick down the center of each dot to make a heart.
(Wipe the toothpick after each drag for a "clean" heart.  If you look at the hearts, you can see where I forgot to wipe the toothpick on a dot...there's a line down the top.)

Let the cookies dry at least 30 minutes.

giraffe valentine detail photo giraffevalentine7of14.jpg
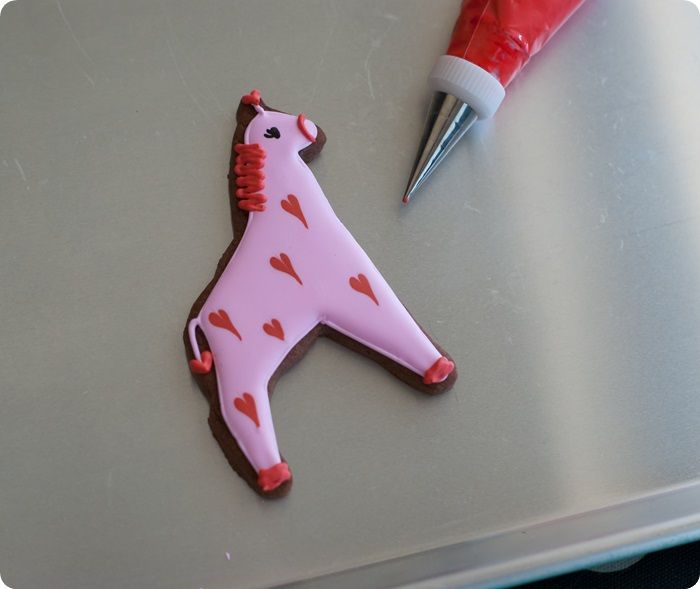
Use a #1 tip to add a mane, heart on the tail, hooves, detail on the face, and heart on the horn.

Let the cookies dry uncovered 6-8 hours or overnight.

The next day, add the eye with a black food coloring pen.
"wanna neck" giraffe valentine cookies ♥
Happy ♥ Day!  


Labels: ,

Sunday, February 9, 2014

Made with Love: Stamped Almond Shortbread Cookies

made with love ♥ pink almond shortbread cookies from @bakeat350
I let out a little squeal when I first pressed this stamp into my cookie dough.  How *cute* is that?

made with love ♥ pink almond shortbread cookies from @bakeat350
Let me tell you about the cookie recipe first: almond shortbread.  The recipe is simple and straightforward...and it contains no eggs or baking powder that might make the cookie too poofy to hold the impression from the stamp.

The cookies may be simple, but don't be fooled; they are fabulous!  Buttery, almond-y(?), and slightly salty...my husband declared these some of his favorite cookies ever.  Even it you don't plan to use the cookie stamps, I beg you to try these, just flattening out the dough with a glass.

pink almond shortbread stamps photo pinkalmondshortbreadcookies1of1.jpg
The stamps are from World Market.  I picked mine up at my local store, but they're available online, too.  Yay!

made with love ♥ pink almond shortbread cookies from @bakeat350
You can see that the cookies do poof a bit in the oven, but I still think you can see the imprint just fine.  If a little poof bothers you, (a.) please don't look at my midsection, and (b.) try replacing some of the butter with shortening.  I baked these right after stamping, and also tried popping them in the freezer for 10 minutes prior to baking...the freezing made no difference.

made with love ♥ pink almond shortbread cookies from @bakeat350

print recipe photo printrecipe.jpg

Stamped Almond Shortbread Cookies

{makes 15}

1 cup (2 sticks) unsalted butter
1 teaspoon kosher salt
3/4 cup sugar
1 teaspoon pure almond extract
electric pink food coloring
2 & 1/3 cups unbleached, all-purpose flour, plus more for dipping the stamps

Line 2 cookie sheets with parchment.  Preheat oven to 350.

In a large bowl of an electric mixer, beat the butter, salt and sugar together until fluffy.  Beat in the almond extract and pink food coloring.

PINK(!) almond shortbread dough
{You'll want the dough to be fairly bright at this stage, as the flour will mute the color a bit.}

On low speed, add in the flour, mixing until combined.

pink almond shortbread dust photo pinkalmondshortbreadcookies8of12.jpg
Spoon some flour onto a plate for dipping the stamps (or the bottom of a glass) before pressing into the dough.  Use a pastry brush to brush off the excess.

made with love ♥ pink almond shortbread cookies from @bakeat350
Roll the dough into 2" balls.  Press the floured stamps into the balls of dough.

pink almond shortbread trim photo pinkalmondshortbreadcookies7of12.jpg
Trim off the excess if desired.

Bake for 12 minutes.  Let cool on the cookie sheet for 2 minutes, then transfer to a cooling rack to cool completely.

{Adapted from King Arthur Flour Essential Shortbread}

made with love ♥ pink almond shortbread cookies from @bakeat350
♥Made with Love♥


Labels: ,

Thursday, January 23, 2014

And now, we will relive junior high. I'm sorry.

If we *really* cared about children, we would make a law that 6th - 8th grades are mandatory homeschool years. Especially for awkward, frizzy-haired, pigeon-toed, braces-wearing, overly-sensitive girls.  Junior highs should only be open to football players, cheerleaders, and teenagers with perfect complexions.
"do you like me" note cookies...simple and easy to make...perfect for valentine's day!
I mean, wouldn't that just make life nicer?

Some of my least favorite childhood memories come from middle school.  Included in those memories are these notes.  The "do you like me" notes.  The notes that NEVER came back checked with a "yes."

"do you like me" note cookies...simple and easy to make...perfect for valentine's day!
As I remember, usually a friend passed these notes on your behalf.  "Do you like Bridget?"  And then, the friend would share with you...and 20 other girls...the giant X in the "no" box.

{Have I mentioned how much I love NOT being in junior high?}

So, now we fix things.  Now we check YES!  (And, maybe "as a friend" because that's OK, too!)
Take THAT, junior high!  (I may have some unresolved issues here.)

Y'all...these cookies could not be easier.  I know I say that all the time.  I am becoming the queen of the easy cookie...in my old age, I'm too lazy for complicated. ;)

"do you like me" note cookies...simple and easy to make...perfect for valentine's day!
These "do you like me" cut-out cookies are topped with fondant, which means no making royal icing, no piping, no flooding, no waiting for the icing to dry.  In other words, you could bake, decorate and GIVE these cookies all on the same day.

My favorite fondant is Satin Ice brand.  It can be found on Amazon or at Sur la Table.  You can also make homemade fondant, which is super yummy, but I'll be honest...I normally buy mine.

To make these "do you like me" (junior high nightmare) cookies, you'll need:


Bake the cookies and let cool.

Meanwhile, roll out the fondant to 1/8" thickness on a surface heavily coated with cornstarch.  (Also, dust the rolling pin and cookie cutter with cornstarch.)  I like these guides for even rolling. Use the same cutter as used for the cookie to cut the fondant.

Brush the cooled cookie with corn syrup and place the cut fondant on top.  Smooth and lightly press to adhere.
do you like me lines photo brightdoyoulikeme1of11.jpg
Use food coloring pens to draw lines on the cookie to resemble notebook paper.  I used my rolling guides as a straight edge.
(And wouldn't plain notebook paper cookies be cute, too?)

do you like me words photo brightdoyoulikeme3of11.jpg
Then, add the check boxes and words.

Give the cookies as is...and maybe attach a food coloring pen...
"do you like me" note cookies...simple and easy to make...perfect for valentine's day!
....or, just go ahead and check the "yes" box.  We're not in junior high anymore.
THANK GOODNESS. 

"do you like me" note cookies...simple and easy to make...perfect for valentine's day!


Labels: ,

Monday, January 20, 2014

5 Cute and Simple Valentine Cookie Ideas

Valentine's Day always has a way of sneaking up on me, cookie-wise.  I think I love heart-shaped cookies more than anything, but always feel like I can't actually start making them until February.  Then for two weeks, my house is covered in pink and red icing.

If you want to get a head start on your Valentine cookies this year (it's only 3 weeks away), here are some ideas for you.  All 5 of these cookie designs are simple and easy to recreate:


5 cute & simple decorated valentine cookie ideas ♥

  1. Carved initials in a tree: If piping letters isn't your thing, you'll love these.  The initials are added with a food coloring pen.  Easy Peasy.
  2. True Love: Morticia & Gomez, Lucy & Ricky, William & Kate...which couples would make it on to your cookies?  I love the way the colors pop on the black outline with these.
  3. The Perfect Pair: Ok...the puns are endless with these little sock cookies.  "I'd be lost without you." ;)
  4. Olive You Martini Cookies: These are some of my favorite cookies ever.  I so wish olives really *did* have heart-shaped pimentos. ♥
  5. Double-decker striped hearts: And, this is where my obsession with the double-decker cookies was born.  Two cookies in one, people!!!

Here are some of my favorite valentine cookies from other blogs:

Will you be making Valentine cookies this year?


    Labels:

    Friday, February 15, 2013

    Smitten: Mr. Bates + Anna

    Valentine's Day has come and gone, but we can still talk about love, right?!?
    As of yesterday, I'm caught up on Downton Abbey.
    {Now, *what* will I do with my free time?!?}

    Side note: Let me say that watching Downton Abbey has made me long for a return to chivalry, manners, dressing for dinner, and politeness.  Yesterday, at the Godiva store, I approached the cashier to buy a truffle from the case.  Instead of asking "how may I help you," or even "hello," the cashier said, "what's up?"  Only when I got in the car did I think that I should have answered, "yo." 

    Anyhoo...no spoilers here, since I know many of you are just jumping on the Downton bandwagon, but ever since there was that little spark between Anna & Mr. Bates in the first episode, I've been completely smitten with these two.  ♥


    And, I thought their cookies deserved a little lace.

    Lace is about the easiest way to decorate a cookie with piping.  You really can't do it wrong...and you get major bang for your buck...or pipe...or whatever.  It looks classy and elegant and all you did was pipe on random designs.  (I'll link at the bottom of the post to some lace inspiration from other blogs.)


    To make the cookies, you'll need:
    Use a #3 tip to outline the cookies in black icing.  (I chose a #3 tip here since I really wanted the outline to show.)

    Thin the purple and ivory icings with water, a bit at a time, stirring with a silicone spatula, until it is the consistency of a thick syrup.  (Reserve some of the white icing for piping details later.) You'll want to drop a "ribbon" of icing back into the bowl and have it disappear in a count of "one thousand one, one thousand two." Four is too thick, one is too thin.  Count of 2-3 is good.  Cover with a damp dishcloth and let sit for several minutes.

    Stir gently with a silicone spatula to pop and large air bubbles that have formed.  Pour into squeeze bottles.

    Fill in the outlines with the thinned icing, using a toothpick to guide to the edges and to pop large air bubbles. 

    Let the cookies dry for at least one hour.

    Use a #1 tip to pipe a lace pattern and/or personalization onto the cookies.  For inspiration, try an google image search for "simple lace" or "lace patterns."

    Let the cookies dry, uncovered, 6-8 hours or overnight.

    For more lace cookie inspiration, check out these beauties:

    Now, without any spoilers...let's not ruin it for the Downton newbies out there...are you as in love with Mr. Bates & Anna as I am? ♥


    Sur La Table 120x600 11.27.07

    Labels: ,

    Wednesday, February 13, 2013

    I'm Batty for You!

    You're a Homerun!

    Please don't let me Strike Out!

    I hope our love goes Extra Innings!

     Swing, Batter Batter Batter, SWING, Batter!
    {ok...that has nothing to do with Valentine's Day. I just like a Ferris Bueller reference where I can get it.} Click the link to watch...it's in the upper left corner of the linked page.


    You're a Hit!

    Don't throw me a Curve Ball!

    I love you at Home or Away!  

    You've Stolen my heart! 

    We make a great Team!

    {Let's skip the whole "getting to second base" theme.}

    As the mom of a boy, I know they usually get the short end of the stick when it comes to Valentine's Day.  Not everything has to be pink, and ribbons, and lace (and I love those things)!
    Valentines for boys can be cute, too!!!

    In Decorating Cookies, I created some Heart Robot cookies...which is one of my favorite designs in the whole book.  Yay for boy valentines!  Today...Baseball Valentines.

    {These cookies were inspired by this Valentine from Minted....how cute is that card?!?}

    To make baseball valentine cookies, you'll need:
    Using #2 tips, outline all of the cookies.  Outline the caps and hearts in white and the bats in brown.

    Thin the brown and white icings with water, a bit at a time, stirring with a silicone spatula, until it is the consistency of a thick syrup.  (Reserve some of the white icing for piping details later.) You'll want to drop a "ribbon" of icing back into the bowl and have it disappear in a count of "one thousand one, one thousand two." Four is too thick, one is too thin.  Count of 2-3 is good.  Cover with a damp dishcloth and let sit for several minutes.

    Stir gently with a silicone spatula to pop and large air bubbles that have formed.  Pour into squeeze bottles.

    Fill in the outlines with the thinned icing, using a toothpick to guide to the edges and to pop large air bubbles. 

    Let the cookies dry for 30 minutes to one hour.

    Use #1 tips to add detail piping to the caps and the heart "baseballs." I like to make the stitching into little hearts.

    Let the cookies dry 6-8 hours or overnight.

    Once they are completely dry, mix water with the chocolate brown food coloring....a 1 to 1 ratio or so.  Trim the fan brush, so that it is uneven.  Dip the brush into the food coloring mixture, dab the excess on a paper towel and brush onto the cookies.

    The food coloring will dry fairly quickly and be ready for packaging and giving.

    What baseball phrase would you use on a Valentine? 


    Labels: ,

    Tuesday, January 29, 2013

    All You Need is...

    ...LOVE (cookies).

    When I saw this cookie cutter in the Fancy Flours catalog, I knew immediately that I must have it.

    You're probably familiar with this image.  It was originally created by aritst Robert Indiana for a Christmas Card and was recreated into sculptures.  I've always loved it...and you just might live near one.  (Here's a list.)

    Because we're friends.  Because I trust you have embarrassing pictures in your photo albums.  Because this outfit must never be recreated.  I'm going to show you a picture of when my sister & I had our picture taken with one of the statues.
    I know. The year was 1988-ish.  This orange and white fiasco was my FAVORITE OUTFIT.  (I'm not even kidding.)  What you can't see?  I completed the look with orange lipstick and nail polish.  Oh, and the HAIR!!!  Totally high-as-the-sky mall claw in front, crazy highlighted curls in a triangle shape the rest of the way around.  Lovely.

    {I wonder why I didn't date much?}

    I was so deep in thought, wondering if I should share that picture, I forgot to take pictures for a cookie tutorial.

    Luckily, it's a simple outline and flood with royal icing.  I used AmeriColor Super Red, Deep Pink, Soft Pink & Electric Pink.  And, here's a link to the cookie cutter again.

    All you need is love...
    and possibly a shredder for all photos from the 1980's.


    Sur La Table 120x600 11.27.07

    Labels: